Elegant Pistachio Mascarpone Cake
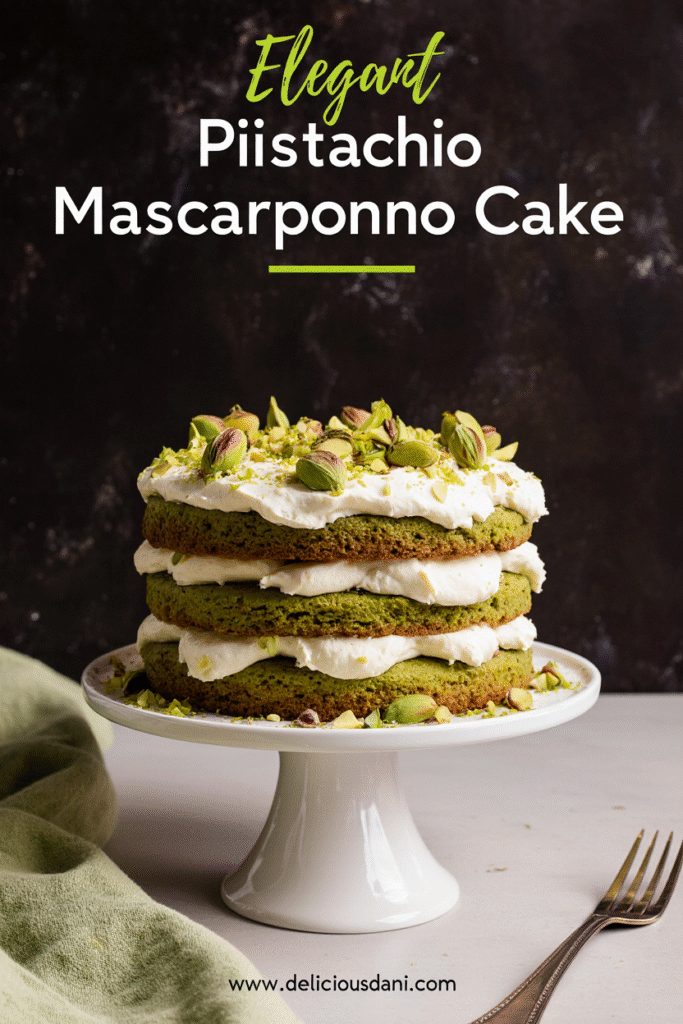
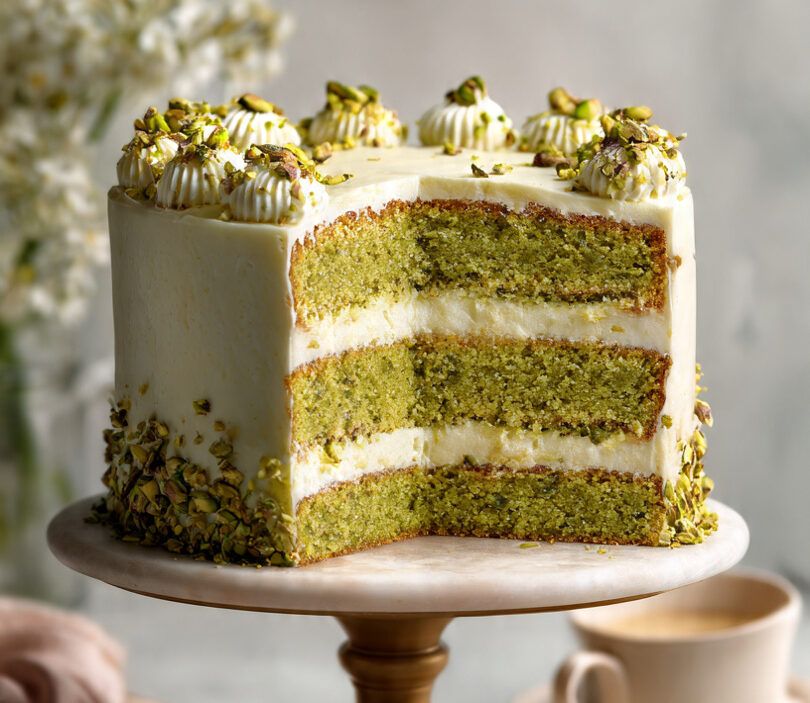
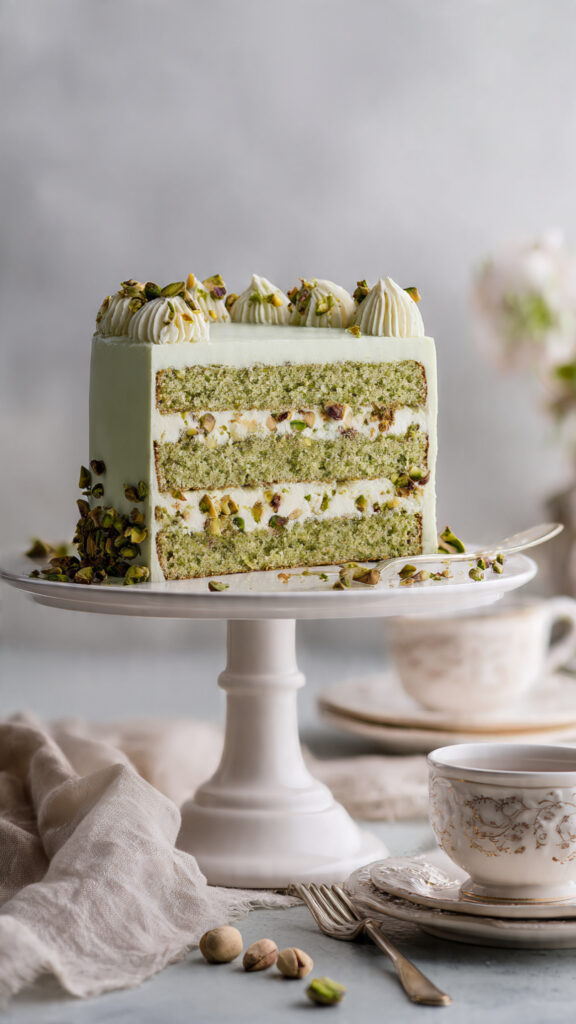
Prepare to be absolutely enchanted by this Elegant Pistachio Mascarpone Cake – a sophisticated showstopper that combines the delicate, nutty flavor of pistachios with the luxurious creaminess of Italian mascarpone cheese. I first discovered the magic of this flavor combination during a trip to Sicily, where pistachio desserts reign supreme and every bakery window displays these gorgeous green-hued cakes. Inspired by those memories, I created this recipe that brings together tender pistachio-studded cake layers, silky mascarpone frosting, and the most beautiful natural green color that comes entirely from real pistachios (no food coloring needed!). What makes this cake truly special is its perfect balance – it’s decadent without being heavy, sweet without being cloying, and elegant without being fussy. The mascarpone frosting is lighter than traditional buttercream but infinitely more sophisticated, with a subtle tanginess that perfectly complements the nutty pistachio. Every time I serve this cake at dinner parties or special celebrations, it steals the show and has guests asking for seconds (and the recipe!). Whether you’re celebrating a birthday, anniversary, bridal shower, or simply want to treat yourself to something extraordinary, this pistachio mascarpone cake will make any occasion feel like a special event!
Overview of Recipe Content
Elegant Pistachio Mascarpone Cake is perfect for sophisticated celebrations including weddings, anniversaries, bridal or baby showers, birthday parties, Valentine’s Day, Mother’s Day, holiday gatherings, or any time you want to create something truly memorable and beautiful. It’s a great recipe because it delivers restaurant-quality results at home, showcases the naturally gorgeous color of pistachios, and combines Italian-inspired flavors in a way that feels both luxurious and approachable. The flavor profile is elegantly balanced: delicate pistachio cake with a subtle nuttiness and tender crumb, complemented by tangy-sweet mascarpone frosting that’s lighter than buttercream but incredibly rich, with optional hints of vanilla, almond, or even rose water for added sophistication. This recipe is perfect for experienced home bakers looking to expand their repertoire, anyone who loves Italian desserts, pistachio enthusiasts, hosts wanting an impressive centerpiece dessert, or anyone seeking a refined alternative to traditional American layer cakes. The cake can be customized with different fillings, decorated simply or elaborately, and adapted for various dietary needs.
Ingredients
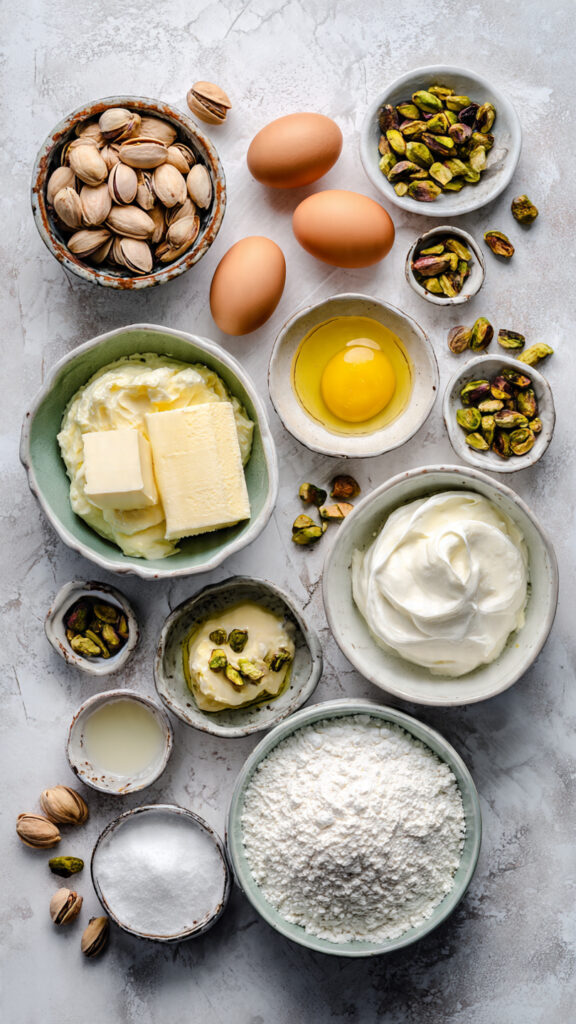
For the Pistachio Cake:
| Ingredient | Quantity |
|---|---|
| Shelled raw pistachios (unsalted) | 1½ cups (180g) |
| All-purpose flour | 2 cups (250g) |
| Baking powder | 2 teaspoons |
| Baking soda | ½ teaspoon |
| Salt | ½ teaspoon |
| Unsalted butter, softened to room temperature | ¾ cup (170g) |
| Granulated sugar | 1½ cups (300g) |
| Large eggs, room temperature | 4 |
| Vanilla extract | 1 teaspoon |
| Almond extract | ½ teaspoon |
| Whole milk, room temperature | 1 cup (240ml) |
| Sour cream or Greek yogurt, room temperature | ½ cup (120g) |
| Green food coloring (optional) | 2-3 drops |
For the Mascarpone Frosting:
| Ingredient | Quantity |
|---|---|
| Mascarpone cheese, cold | 16 oz (450g) |
| Unsalted butter, softened to room temperature | 1½ cups (340g) |
| Powdered sugar, sifted | 4 cups (480g) |
| Vanilla extract | 2 teaspoons |
| Almond extract (optional) | ¼ teaspoon |
| Heavy cream (if needed for consistency) | 2-3 tablespoons |
| Salt | Pinch |
For the Simple Syrup (Optional but Recommended):
| Ingredient | Quantity |
|---|---|
| Granulated sugar | ½ cup (100g) |
| Water | ½ cup (120ml) |
| Vanilla extract or rose water | 1 teaspoon or 1 tablespoon |
For Garnish and Decoration:
| Item | Quantity |
|---|---|
| Chopped pistachios | ½ cup (60g) |
| Whole or halved pistachios | ¼ cup (30g) |
| Edible flowers (optional) | As desired |
| White chocolate shavings (optional) | As desired |
| Pistachio paste or ground pistachios for dusting | As desired |
| Fresh berries (optional) | As desired |
Tools Needed
- Food processor or high-powered blender
- Three 8-inch or 9-inch round cake pans
- Parchment paper
- Large mixing bowls (2-3)
- Electric hand mixer or stand mixer
- Rubber spatula
- Fine-mesh sieve
- Measuring cups and spoons
- Cooling racks
- Cake turntable (optional but helpful)
- Offset spatula
- Piping bags and tips (optional)
- Cake board or serving plate
- Small saucepan (for simple syrup)
- Pastry brush
- Toothpicks or cake tester
- Serrated knife (for leveling)
Suggested Substitutions and Additions
Pistachio Options:
- Raw unsalted pistachios: Best choice for purest flavor and color
- Roasted unsalted pistachios: Deeper, toastier flavor but may affect color
- Pistachio paste: Can substitute ½ cup pistachio paste for half the ground pistachios
- Pistachio flour: If available, can replace half the ground pistachios for finer texture
- Almond flour: Can substitute up to ½ cup, though you’ll lose the pistachio flavor
Mascarpone Alternatives:
- Full-fat mascarpone: Essential for best results
- Cream cheese: Can substitute, but add 2 extra tablespoons butter and expect tangier flavor
- Combination: Half mascarpone, half cream cheese works well
- Crème fraîche: More tangy but sophisticated alternative
Milk Substitutes:
- Whole milk: Best for richness and moisture
- 2% milk: Works but cake will be slightly less rich
- Buttermilk: Creates tangier, more tender cake
- Almond milk: For dairy-free version (use with other dairy-free swaps)
- Coconut milk: Adds subtle coconut flavor
Flavor Enhancements:
- Add 1 teaspoon rose water to cake batter for Middle Eastern flair
- Incorporate 2 tablespoons orange zest for citrus brightness
- Add ¼ cup white chocolate chips to batter
- Mix in 2 tablespoons honey for deeper sweetness
- Add ½ teaspoon cardamom for warm spice notes
- Incorporate lemon zest for bright contrast
Filling Variations:
- Spread raspberry or strawberry jam between layers
- Add lemon curd for tart contrast
- Use white chocolate ganache for extra richness
- Layer with fresh berries and whipped cream
- Spread Nutella for chocolate-pistachio combination
- Add pistachio cream or pistachio butter
Frosting Modifications:
- Add 2 tablespoons pistachio paste for more intense flavor
- Incorporate rose water or orange blossom water
- Mix in melted white chocolate for stability
- Add cream cheese for tangier frosting
- Fold in whipped cream for lighter texture (Swiss mascarpone cream)
Dietary Adaptations:
- Gluten-free: Use gluten-free flour blend (1:1 substitution)
- Dairy-free: Use plant-based butter, coconut cream, and dairy-free mascarpone alternative
- Reduced sugar: Reduce sugar by up to ¼ cup (affects texture slightly)
- Egg-free: Use flax eggs (3 tablespoons ground flax + 9 tablespoons water) though texture will differ
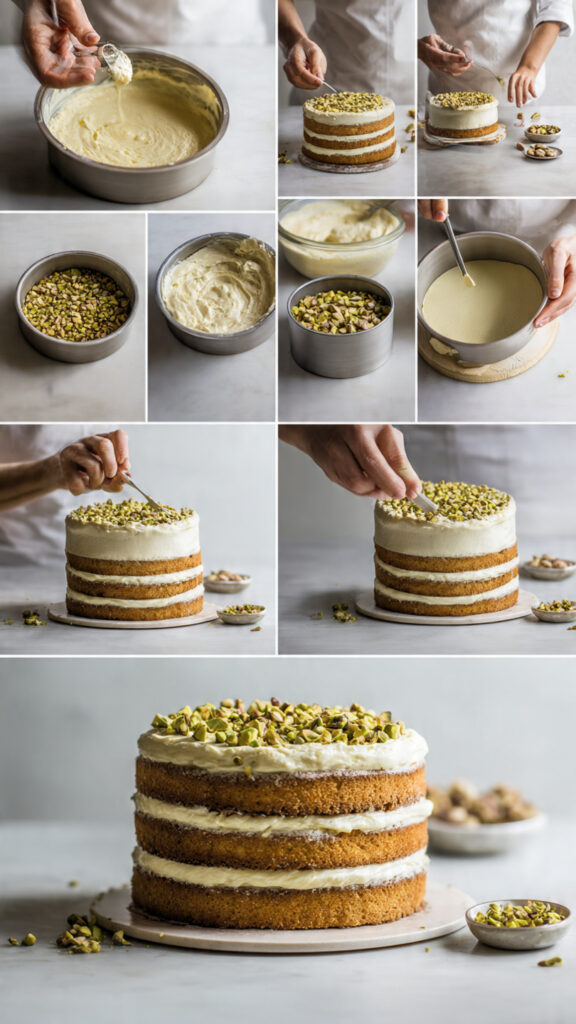
How to Make Elegant Pistachio Mascarpone Cake
Step 1: Prepare Pistachios and Preheat Oven
Begin by preheating your oven to 350°F (175°C). Grease three 8-inch or 9-inch round cake pans generously with butter or cooking spray, then line the bottoms with parchment paper circles. Grease the parchment as well, then lightly dust with flour, tapping out the excess. This double insurance ensures your cakes will release perfectly.
Now for the most important step – processing your pistachios! Place the raw, shelled pistachios in a food processor and pulse until they’re finely ground, almost to a flour-like consistency. Be careful not to over-process or you’ll end up with pistachio butter – pulse in short bursts and scrape down the sides periodically. The texture should resemble fine cornmeal or almond flour with some slightly larger pieces for texture. You should have approximately 1½ cups of ground pistachios. Set aside ¼ cup for garnish if desired. This fresh pistachio flour is what gives the cake its beautiful natural green color and incredible flavor – no artificial coloring needed (though you can add a drop or two of green food coloring if you want a more vibrant hue).
Step 2: Mix Dry Ingredients and Cream Butter
In a large bowl, whisk together the all-purpose flour, baking powder, baking soda, and salt. Add the finely ground pistachios to the flour mixture and whisk thoroughly to combine. The pistachios should be evenly distributed throughout the flour. Set this bowl aside.
In the bowl of your stand mixer fitted with the paddle attachment (or using a hand mixer in a large bowl), beat the softened butter on medium speed for about 2 minutes until light and creamy. The butter should be room temperature – not cold, not melted, but soft enough that you can easily press a finger into it. Gradually add the granulated sugar and continue beating on medium-high speed for 4-5 minutes until the mixture is very light, fluffy, and pale in color. This creaming process is crucial – it incorporates air into the batter, which creates a tender, light cake texture. Scrape down the sides and bottom of the bowl occasionally to ensure even mixing.
Step 3: Add Eggs and Flavorings
Add the eggs one at a time to the butter-sugar mixture, beating well after each addition (about 30 seconds per egg) and scraping down the bowl between additions. The mixture may look slightly curdled after adding eggs – this is normal and will come together when you add the dry ingredients. After all eggs are incorporated, add the vanilla extract and almond extract, beating until combined. The almond extract enhances the nutty pistachio flavor beautifully, but don’t add more than called for or it will be overpowering.
In a separate measuring cup or small bowl, whisk together the whole milk and sour cream (or Greek yogurt) until smooth. The sour cream adds moisture, tenderness, and a subtle tang that balances the sweetness. Make sure both ingredients are at room temperature – cold dairy can cause the butter to seize and create a lumpy batter.
Step 4: Combine Wet and Dry Ingredients
Now it’s time to bring everything together using the classic alternating method. With your mixer on low speed, add about one-third of the flour-pistachio mixture to the butter mixture. Mix just until the flour streaks begin to disappear. Add half of the milk-sour cream mixture and mix until just combined. Add another third of the flour mixture, then the remaining milk mixture, and finally the last of the flour mixture.
Mix each addition only until just combined – you should still see a few flour streaks when you add the last portion. Once all ingredients are added, finish mixing by hand with a rubber spatula, scraping the bottom and sides of the bowl and folding gently until the batter is uniform with no flour pockets. The batter should be thick but pourable, smooth, and a beautiful pale green color. Do not overmix – this is the most common mistake that leads to dense, tough cakes! Overmixing develops gluten, which creates a chewy texture instead of a tender crumb.
Step 5: Bake the Cake Layers
Divide the batter evenly among your three prepared pans – using a kitchen scale is most accurate (each pan should have approximately 500-550g of batter), but you can also eyeball it or use measuring cups. Spread the batter evenly in each pan with a spatula, making sure to reach all edges. Tap each pan firmly on the counter 3-4 times to release any air bubbles trapped in the batter.
Place the pans in your preheated 350°F (175°C) oven, spacing them evenly so air can circulate. If they don’t all fit on one rack, stagger them on two racks and rotate halfway through baking. Bake for 25-30 minutes for 8-inch pans or 23-27 minutes for 9-inch pans. The cakes are done when they’re golden on top, spring back when lightly touched in the center, and a toothpick inserted into the center comes out clean or with just a few moist crumbs (no wet batter). The tops should be domed slightly and pulling away from the pan edges.
Remove from the oven and let the cakes cool in their pans on wire racks for exactly 10 minutes – no more, no less. After 10 minutes, run a knife around the edges to loosen, then invert each cake onto a wire rack, peel off the parchment paper, and flip right-side up to cool completely. This should take at least 1-2 hours. Never frost warm cakes or your frosting will melt!
Step 6: Make the Mascarpone Frosting
While your cakes cool, prepare the luxurious mascarpone frosting. This frosting is temperamental, so follow the instructions carefully! In the bowl of your stand mixer fitted with the paddle attachment, beat the softened (but not warm) butter on medium speed for 3-4 minutes until very light and fluffy. Gradually add the sifted powdered sugar, one cup at a time, mixing on low speed after each addition to avoid a sugar cloud. Once all sugar is incorporated, increase speed to medium-high and beat for 2-3 minutes until fluffy.
Add the vanilla extract, almond extract (if using), and salt. Beat briefly to combine. Now comes the critical part: add the cold mascarpone cheese all at once. Beat on LOW speed for only 15-20 seconds, just until combined and smooth. Do NOT overbeat – mascarpone can separate and become grainy if overworked. The frosting should be smooth, creamy, and spreadable. If it’s too stiff, add heavy cream one tablespoon at a time; if too soft, refrigerate for 15-20 minutes to firm up slightly. The finished frosting should hold peaks but be creamy enough to spread smoothly.
Step 7: Prepare Simple Syrup (Optional but Recommended)
For the most professional, moist cake, prepare a quick simple syrup. In a small saucepan, combine the sugar and water. Bring to a boil over medium heat, stirring until sugar dissolves completely. Remove from heat and stir in vanilla extract or rose water. Let cool to room temperature. This syrup will be brushed onto each cake layer before frosting, ensuring the cake stays incredibly moist and adding an extra layer of flavor. Professional bakeries always use this technique!
Step 8: Assemble and Frost the Cake
Once your cake layers are completely cool, it’s time to assemble! If the tops are domed, use a long serrated knife to level them, creating flat, even layers. Place the first cake layer on your serving plate or cake board. Using a pastry brush, brush about 2-3 tablespoons of simple syrup over the top of the cake layer, allowing it to soak in.
Spread about ¾ cup of mascarpone frosting evenly over the first layer, spreading it all the way to the edges. If using a filling (like jam or lemon curd), spread it in the center, leaving a ½-inch border, then pipe a border of frosting around the edge to contain it. Place the second cake layer on top, pressing down gently to adhere. Brush with more simple syrup and repeat the frosting process. Top with the final cake layer (place it bottom-side up for a perfectly flat top), and brush with remaining syrup.
Apply a thin “crumb coat” of frosting over the entire cake – this seals in crumbs and creates a smooth base for the final coat. Don’t worry about it being perfect; it’s meant to be thin. Refrigerate for 20-30 minutes until the crumb coat is firm. Then apply the final, generous coat of frosting, using an offset spatula and rotating the cake on a turntable if you have one. Smooth the sides and top, creating whatever finish you prefer – smooth and elegant, rustic with visible spatula marks, or textured with swirls.
Step 9: Decorate and Finish
Now for the fun part – decorating! Press chopped pistachios around the bottom border of the cake, creating a beautiful green trim. Sprinkle more chopped pistachios on top, or arrange whole or halved pistachios in a decorative pattern. You can also dust the top lightly with ground pistachios or pistachio paste for a more vibrant green appearance.
For an extra elegant touch, pipe frosting rosettes or borders using a piping bag fitted with a star tip. Add edible flowers for a romantic look, white chocolate shavings for contrast, or fresh berries for color and freshness. The natural green of the pistachios against the white frosting creates a stunning visual that needs minimal decoration – sometimes simple is most elegant! Refrigerate the finished cake for at least 1 hour to set before slicing.
What to Serve with It
Elegant Pistachio Mascarpone Cake is a showstopping dessert that stands beautifully on its own, but certain accompaniments can enhance the experience. Serve each slice with a small scoop of vanilla bean gelato or pistachio gelato for an authentic Italian experience – the cold, creamy gelato contrasts perfectly with the tender cake.
A drizzle of white chocolate ganache or honey on the plate adds both visual appeal and complementary sweetness. For a sophisticated touch, serve with sweetened whipped cream flavored with a hint of rose water or orange blossom water. Fresh raspberries or strawberries on the side provide tartness that cuts through the richness and adds beautiful color contrast.
For beverages, this cake pairs beautifully with espresso, cappuccino, or a rich coffee – the slight bitterness balances the sweet frosting perfectly. Champagne or Prosecco makes it celebration-worthy, while dessert wines like Moscato d’Asti, Vin Santo, or late-harvest Riesling complement the nutty, delicate flavors. For non-alcoholic options, serve with mint tea, Earl Grey tea, or Italian hot chocolate.
If serving for a special occasion, create a dessert plate with a slice of cake, a quenelle of gelato, a few fresh berries, a drizzle of sauce, and perhaps a delicate tuile cookie or small piece of honeycomb for textural contrast. The presentation makes it feel like a five-star restaurant dessert!
Tips for Making It Perfect
- Use high-quality, fresh pistachios: Since pistachios are the star ingredient, quality matters enormously. Use raw, unsalted, fresh pistachios with vibrant green color. Old or rancid pistachios will have a bitter, off flavor that ruins the cake. Store pistachios in the freezer to maintain freshness, and smell them before using – they should have a sweet, nutty aroma, not a musty or bitter smell.
- Bring all ingredients to room temperature: This is crucial for proper emulsification and even mixing. Cold eggs and dairy can cause the butter to seize and create a lumpy batter. Set out your eggs, milk, sour cream, and butter at least 1-2 hours before baking. To quickly warm eggs, place them (in shells) in a bowl of warm water for 5-10 minutes.
- Don’t overbeat the mascarpone frosting: This is the #1 mistake people make! Mascarpone is delicate and can separate or become grainy if overbeaten. Once you add the mascarpone to the butter-sugar mixture, beat on LOW speed for only 15-20 seconds, just until combined. If it does break and become grainy, try chilling it for 30 minutes, then beating briefly on low with a tablespoon of cold heavy cream.
- Level your cakes for professional results: Domed cake tops create unstable, lopsided layers. Use a long serrated knife and a gentle sawing motion to level each layer, or invest in a cake leveler tool. Save those scraps – they’re perfect for snacking or making cake crumbs for decoration!
- Use simple syrup for moisture: Brushing each layer with simple syrup is the secret to bakery-quality moisture that lasts for days. It also prevents the cake from drying out in the refrigerator. Don’t skip this step if you want your cake to stay fresh and delicious, especially if making a day or two ahead.
- Chill between frosting steps: Applying a crumb coat and chilling before the final coat makes frosting so much easier and creates a cleaner, more professional appearance. The cold crumb coat catches any stray crumbs and provides a smooth base that makes the final coat glide on effortlessly. Be patient with this step – it makes a huge difference in the final presentation.
- Work in a cool kitchen: Mascarpone frosting can soften quickly in warm temperatures. If your kitchen is warm, work near an air conditioner, or refrigerate the frosting periodically while decorating. If the frosting becomes too soft to work with, chill it for 15-20 minutes to firm up. Conversely, if it’s too stiff, let it sit at room temperature for a few minutes or add a tablespoon of cream.
Storage Instructions
Room Temperature: Due to the mascarpone in the frosting, this cake should not sit at room temperature for more than 2-3 hours. For serving, you can bring it to room temperature 30-60 minutes before slicing for the best texture and flavor, but return leftovers to the refrigerator promptly.
Refrigerator: Store the frosted cake covered in the refrigerator for up to 5 days. To prevent the frosting from absorbing odors or drying out, cover loosely with plastic wrap or place under a cake dome. For best results, bring individual slices to room temperature for 15-20 minutes before serving – the flavors bloom and the texture softens beautifully when not ice-cold. The cake actually improves after a day as the flavors meld and the simple syrup continues to keep it moist.
Freezer (Unfrosted Layers): Baked, cooled cake layers freeze beautifully for up to 3 months. Wrap each layer tightly in plastic wrap, then in aluminum foil, and place in a freezer bag. Label with the date. To use, thaw overnight in the refrigerator still wrapped, then bring to room temperature before frosting. This is perfect for making the cake components ahead for special occasions!
Freezer (Frosted Cake): You can freeze the fully frosted cake, though the texture of mascarpone frosting may change slightly upon thawing. To freeze: place the frosted cake in the freezer uncovered for 1-2 hours until the frosting is firm, then wrap carefully in plastic wrap and foil. Freeze for up to 2 months. Thaw overnight in the refrigerator, still wrapped, then unwrap and let come to room temperature before serving.
Make-Ahead Strategy: For stress-free entertaining, bake the cake layers 1-2 days ahead and store wrapped at room temperature or refrigerated. Make the frosting 1 day ahead and refrigerate (bring to room temperature and re-whip briefly before using). Assemble and frost the day before your event, then refrigerate overnight. This actually allows the flavors to develop and makes slicing cleaner!
General Information
Pistachios have been cultivated for thousands of years in the Middle East and Mediterranean regions, with evidence of their consumption dating back to 7000 BCE. Known as “the smiling nut” in Iran due to the natural split in the shell, pistachios have long been considered a symbol of wellness and good fortune. Sicily, particularly the town of Bronte on the slopes of Mount Etna, produces some of the world’s most prized pistachios, renowned for their intense flavor and vibrant green color.
In Italian cuisine, pistachios are featured prominently in both sweet and savory dishes, from pasta sauces to gelato to elaborate desserts. The combination of pistachios with mascarpone – a rich, creamy cheese from the Lombardy region of Italy – is a relatively modern pairing but one that celebrates two of Italy’s finest ingredients. Mascarpone, which dates back to at least the 16th century, is traditionally made from cream and citric or tartaric acid, resulting in its characteristic smooth, slightly sweet flavor.
While pistachio cakes have been popular in Middle Eastern and Mediterranean cuisines for centuries (often made with rose water and honey), the American-style layer cake format with mascarpone frosting is a contemporary fusion that brings together Italian ingredients with American baking traditions. This elegant hybrid represents the best of both worlds: the sophisticated flavors of Italian pastry with the impressive height and indulgence of American celebration cakes.
The natural green color of pistachios has made them particularly popular for spring celebrations, weddings, and baby showers, though this cake is appropriate for any occasion where you want to serve something both beautiful and delicious. The subtle, refined flavor makes it appealing even to those who claim not to love “nutty” desserts!
Frequently Asked Questions (FAQ)
Q: Can I make this as a sheet cake or different pan sizes? A: Absolutely! This batter works well in various formats. For a 9×13-inch sheet cake, bake at 350°F for 35-40 minutes. For cupcakes, fill liners 2/3 full and bake for 18-22 minutes. For two 9-inch layers instead of three 8-inch, divide the batter between two pans and bake for 28-32 minutes. Always check for doneness with a toothpick. Adjust frosting quantities accordingly – you’ll need less for a sheet cake or two layers.
Q: Why isn’t my cake as green as I expected? A: The natural green color from pistachios is subtle and beautiful but not neon! The color depends on the quality and freshness of your pistachios – Sicilian or California pistachios tend to be greener than Middle Eastern varieties. Using raw (not roasted) pistachios gives the best color. If you want a more vibrant green, you can add 2-3 drops of gel food coloring to the batter, but many people prefer the natural, sophisticated pale green color.
Q: My mascarpone frosting is too soft – how do I fix it? A: Soft frosting is usually because the butter or mascarpone was too warm, or the ratio is off. First, refrigerate the frosting for 20-30 minutes to firm it up. If it’s still too soft, you can beat in additional powdered sugar (1/4 cup at a time) until it reaches the right consistency, or fold in a small amount of whipped cream cheese. In the future, make sure your butter is softened but not warm, and your mascarpone is cold from the refrigerator.
Q: Can I make this cake ahead of time? A: Yes! This cake is actually perfect for making ahead. You can bake the layers 1-2 days in advance and keep them wrapped at room temperature, or freeze them for up to 3 months. The frosting can be made 1 day ahead and refrigerated (bring to room temperature and re-whip gently before using). The fully assembled and frosted cake keeps beautifully in the refrigerator for up to 5 days, and many say it tastes even better on day 2 or 3 as the flavors meld and the simple syrup keeps it incredibly moist.
Q: Can I substitute almond flour for the ground pistachios? A: While almond flour will work structurally, you’ll lose the distinctive pistachio flavor and color that makes this cake special. If you want to use almond flour, consider it a different cake (an almond mascarpone cake) rather than a pistachio version. For true pistachio flavor, there’s really no substitute for grinding fresh pistachios. You can find shelled pistachios at most grocery stores, Middle Eastern markets, or online.
Q: What’s the best way to get the frosting smooth on the sides? A: For perfectly smooth frosting, use a bench scraper or large offset spatula. Apply more frosting than you think you need, then hold the scraper at a 45-degree angle against the side of the cake while rotating the cake turntable (or rotating yourself around the cake). Wipe the scraper clean between passes. For the top, use an offset spatula to smooth from the edge toward the center, wiping the spatula clean between passes. It takes practice, but a crumb coat (thin first layer that’s chilled) makes the final coat much easier to smooth!
Conclusion
I’m so thrilled to share this Elegant Pistachio Mascarpone Cake recipe with you – it truly is one of those special desserts that creates lasting memories and makes any occasion feel extraordinary! The combination of delicate pistachio flavor, luxurious mascarpone frosting, and stunning presentation makes this cake worthy of the most important celebrations in your life. Don’t be intimidated by the multiple steps – take it one stage at a time, and you’ll be amazed at what you can create!
I would absolutely love to hear about your experience baking this cake! Please leave a comment below telling me what occasion you made it for, any variations you tried, or how your guests reacted. If this beautiful cake brought joy to your celebration, please give it a five-star rating – it helps other bakers discover this recipe and encourages me to keep creating!
Don’t forget to take lots of photos of your gorgeous creation and share them on Instagram – tag me so I can admire your beautiful work and celebrate your success! And please pin this recipe to your “Special Occasion Cakes,” “Italian Desserts,” or “Pistachio Recipes” boards on Pinterest so you’ll always have it when a celebration calls for something truly spectacular. Happy baking, and may your cakes always rise beautifully and your frosting always be smooth!
Nutritional Information (per serving)
Based on 12 servings (generous slices)
| Nutrient | Amount |
|---|---|
| Calories | 685 |
| Total Fat | 42g |
| Saturated Fat | 23g |
| Trans Fat | 0g |
| Cholesterol | 165mg |
| Sodium | 285mg |
| Total Carbohydrates | 68g |
| Dietary Fiber | 2g |
| Sugars | 52g |
| Protein | 9g |
| Vitamin A | 18% DV |
| Vitamin C | 2% DV |
| Calcium | 95mg |
| Iron | 2mg |
| Potassium | 245mg |
Note: Nutritional values are approximate and may vary based on specific ingredients, brands, portion sizes, and optional ingredients used. This is a rich, indulgent dessert meant for special occasions.